Shopify Integration
The AnyTrack Shopify integration tracks purchases and key events for eCommerce stores and attributes them to your ads. On paid plans, AnyTrack sends the conversions to platforms like Google Ads, Facebook Ads, and TikTok Ads through the Conversion API.
This guide takes you from install to verified conversions.
Video Tutorial: Set Up Shopify Tracking
Section titled “Video Tutorial: Set Up Shopify Tracking”Watch the complete Shopify setup from start to finish: install the Tracking Tag in your theme, create the five Shopify webhooks, connect your Facebook Pixel with the Conversion API, and see the results in a live Campaign Report.
How it works
Section titled “How it works”AnyTrack collects the full customer journey, enriches it, and, on the Starter plan and above, sends it to your ad platforms. It works in four stages:
How Shopify data flows through AnyTrack
From the first visit to a server-side conversion in your ad platforms
The session starts
When a visitor lands on your store, the AnyTrack Tag opens a session — collecting the traffic source, UTM parameters, and first-party data, and storing them against a click ID (atclid).
Events are tracked two ways
AnyTrack tracks the shopping journey through both channels:
- Client-side (Tracking Tag): collects
PageView,ViewContent, andAddToCartin the browser. - Server-side (Shopify webhooks): collects
AddToCart,InitiateCheckout,AddPaymentInfo, andPurchasefrom cart, checkout, and order events.
Each event is enriched
AnyTrack attaches the session’s attribution data, product details (sku, price, quantity), and any available customer data to every event — so each conversion carries the full context ad platforms need.
Conversions are sent to your ad platforms
On a Purchase, AnyTrack attributes the conversion across your Dashboard reports. On the Starter plan and above, it sends the enriched event server-side to the Conversion API of your ad platforms.




On Starter and above, AnyTrack sends attributed purchases to your connected ad platforms for optimization.
Technical details
Section titled “Technical details”| Supported features | Shopify |
|---|---|
| Plan Ad platforms need Starter or higher. | All plans |
| Required | |
| Tracking method Via Webhook | Server-side tracking |
| Setup method | Webhook URL |
| Setup time | Less than 5 minutes |
| |
| Event attributes | |
| Conversion Mapping Rename or turn off events. | Yes |
| Combined Orders Groups upsells with the purchase. | No |
| Tracking Group Integration reference for AutoTag. | shopify |
| Tracking parameter Carries the click_id. | atclid |
Events AnyTrack tracks
Section titled “Events AnyTrack tracks”AnyTrack tracks the standard eCommerce journey through two channels: the client-side Tracking Tag in the browser and server-side Shopify webhooks. AddToCart is collected on both for maximum reliability.
| AnyTrack event | Source | Shopify trigger |
|---|---|---|
PageView | Client-side (Tracking Tag) | Page load |
ViewContent | Client-side (Tracking Tag) | Product view |
AddToCart | Client-side + Server-side | carts/create, carts/update |
InitiateCheckout | Server-side (webhook) | checkouts/create |
AddPaymentInfo | Server-side (webhook) | checkouts/update |
Purchase | Server-side (webhook) | orders/create |
How events map to your ad platforms
Section titled “How events map to your ad platforms”Each event maps automatically to the matching event in your ad platform, with no manual setup.
| AnyTrack event | Facebook event |
|---|---|
ViewContent | ViewContent |
AddToCart | AddToCart |
InitiateCheckout | InitiateCheckout |
AddPaymentInfo | AddPaymentInfo |
Purchase | Purchase |
Google Analytics 4
| AnyTrack event | GA4 event |
|---|---|
ViewContent | view_item |
AddToCart | add_to_cart |
InitiateCheckout | begin_checkout |
AddPaymentInfo | add_payment_info |
Purchase | purchase |
Shopify Sends Conversions to AnyTrack Using Webhook Notifications
Section titled “Shopify Sends Conversions to AnyTrack Using Webhook Notifications”AnyTrack provides a pre-defined webhook that you can implement with your Shopify account.
https://t1.anytrack.io/hBtoE3hN/collect/ShopifyComplete the setup
Section titled “Complete the setup”Four steps take you from install to verified conversions in less than 5 minutes. Each step shows the access it needs.
Step 1: Install the AnyTrack Tag
Section titled “Step 1: Install the AnyTrack Tag”🔑 Theme code access
Adds the Tracking Tag to your store so AnyTrack can open sessions and collect client-side events like PageView, ViewContent, and AddToCart.
-
Create a new Property in AnyTrack.
-
Set the Shop Name and URL (the root domain) and click Next.
-
Copy the AnyTrack Tracking Tag.
-
In the Shopify admin, edit the theme code.
-
Open the Theme Liquid file and paste the Tracking Tag in the
headsection. -
Save the Theme Liquid file.
Add the AnyTrack tracking tag to the Shopify theme -
Install the AnyTrack Pixel Helper Chrome extension and confirm the Tag is firing on your store.
Watch this video to install the Tracking Tag on Shopify:
Step 2: Add the Shopify integration in AnyTrack
Section titled “Step 2: Add the Shopify integration in AnyTrack”✅ No special access
Connects your store to AnyTrack and generates the webhook URL you’ll add to Shopify in the next step.
-
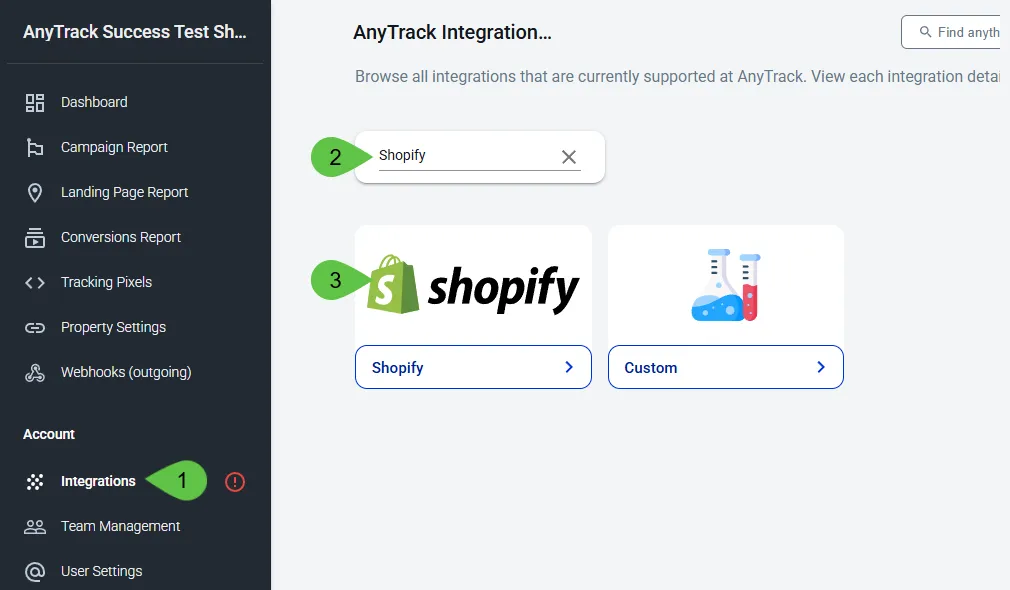
Go to the Integration Catalog and search for Shopify, then click the Shopify card.
-
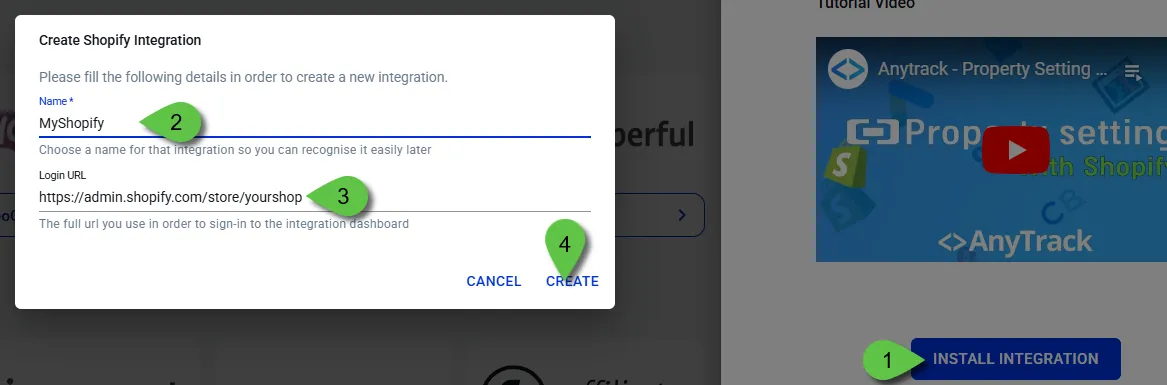
Click Install Integration.
- Enter a Name (e.g. MyShopify).
- Enter your shop URL (or the Shopify admin login URL) and click Create.
Step 3: Add the Shopify notifications
Section titled “Step 3: Add the Shopify notifications”🔑 Shopify admin (Settings → Notifications)
Creates the five Shopify webhook notifications that send cart, checkout, and order events to AnyTrack server-side.
-
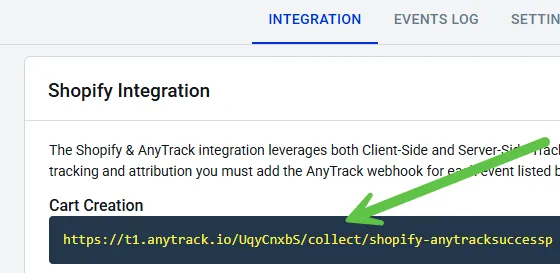
Copy the Webhook URL from the integration.
-
In your Shopify admin, go to Settings → Notifications.
-
Scroll to the Webhooks section and click Create webhook.
- Select an event from the required-events list.
- Leave the format as
JSON. - Paste the AnyTrack Webhook URL.
- Set the Webhook API version to the latest stable version (not Shopify’s default
unstable). - Click Save webhook.
Watch this video to add webhook notifications in Shopify:
Play YouTube video
Step 4: Connect your ad platforms
Section titled “Step 4: Connect your ad platforms”🔑 Ad account access
Connects each ad platform to AnyTrack and adds UTM parameters to your ads, so AnyTrack can report your orders by campaign. On the Starter plan and above, AnyTrack also sends your tracked conversions to each ad platform’s Conversion API, so the platform optimizes on your real orders. You set up this step in the AnyTrack Dashboard and in your ad accounts. Nothing changes in Shopify.
- Connect each ad platform you advertise on. Follow its setup guide:
- Add the UTM Tracking Template of each ad platform to your ads:
Optional settings
Section titled “Optional settings”These aren’t required to start tracking, but they keep your reporting clean:
- Time Zone — match your shop’s time zone in the AnyTrack property settings to avoid reporting discrepancies.
- Base Currency — set the currency your dashboard reports in; AnyTrack converts all revenue into it.
- Client-side tracking settings — the defaults deliver optimal performance; only change them if you know what you’re adjusting.
Change the event for subscription renewals
Section titled “Change the event for subscription renewals”By default, AnyTrack records each Shopify renewal order as a Purchase event. To keep renewals separate from your other orders, rename the Subscription Renewal event. To stop tracking renewals, disable the event.
- On the Shopify integration page, find the Shopify Integration Events section.
- Find the Subscription Renewal row. You can change only this event. AnyTrack locks the other Shopify events.
- Do one of these steps:
- To rename the event, click the conversion event field in the Subscription Renewal row. Then select another event, such as
Upsell, or enter a custom name, such asRenewal. - To stop tracking renewals, clear the checkbox in the Subscription Renewal row.
- To rename the event, click the conversion event field in the Subscription Renewal row. Then select another event, such as
- Click Save.
The change applies to the renewal orders that AnyTrack receives after you click Save. AnyTrack shows the new event name in your reports. An ad platform receives the renamed event only if its Conversion Event Mapping includes the new name. By default, the Conversion Event Mapping of Facebook Ads includes neither Upsell nor custom names. Meta then receives no renewals until you map the new name.
Verify your setup
Section titled “Verify your setup”This section will enable you to validate the main aspects of your setup.
Conversion Tracking
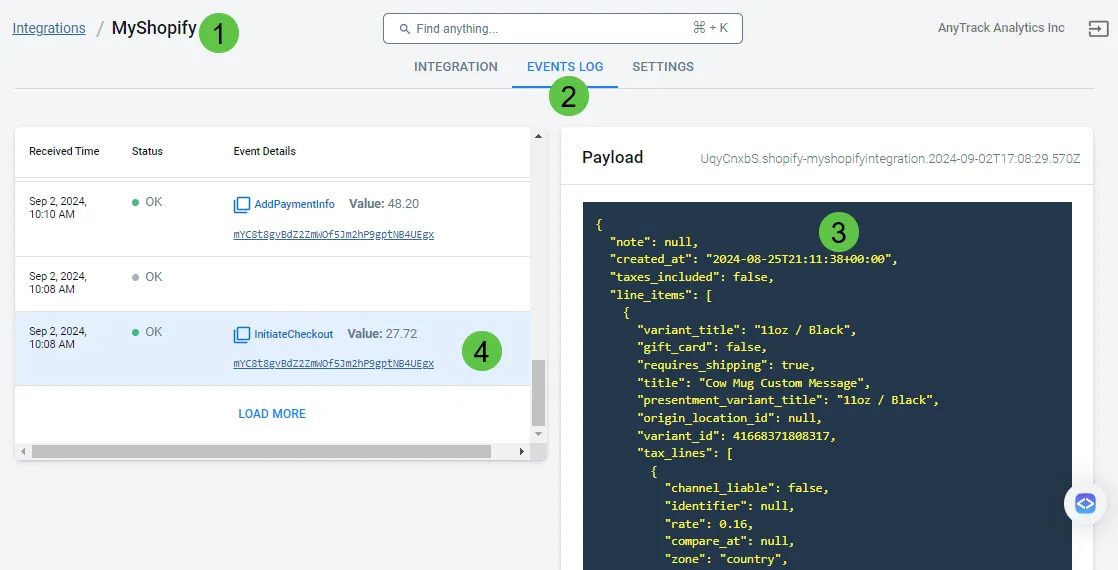
Section titled “Conversion Tracking”To validate your setup, wait for a conversion or trigger a test conversion yourself and inspect the Shopify integration’s Events Log.
Shopify conversion payload example
{ "id": 40881068146749, "created_at": "2024-08-25T21:11:38+00:00", "total_price": "27.72", "subtotal_price": "23.90", "total_tax": "3.82", "currency": "USD", "source_name": "web", "line_items": [ { "title": "Cow Mug Custom Message", "variant_title": "11oz / Black", "price": "11.95", "quantity": 1, "sku": "24675843150437141759", "properties": { "_atclid": "mYC8t8gvBdZ2ZmWOf5Jm2hP9gptNB4UEgx" } } ], "note_attributes": [ { "name": "__atclid", "value": "mYC8t8gvBdZ2ZmWOf5Jm2hP9gptNBCIGGr" } ], "x-Shopify-shop-domain": "0ae3b8-c6.myshopify.com", "x-Shopify-topic": "checkouts/create", "x-Shopify-api-version": "2024-07"}Troubleshooting
Section titled “Troubleshooting”If you encounter issues, check the following:
- Verify the AnyTrack Tag is in the
headsection of your shop - If you’re on the Free plan, check the monthly traffic limit in the billing section
- The Free plan does not include Conversion API for ad platforms
- Confirm you’ve followed the default integration settings
- Install the AnyTrack Pixel Helper Chrome extension to verify the tag is active
Common Questions
FAQ was last reviewed on 2026-06-15
Do I need to remove my existing Meta Pixel (Facebook pixel) or other Shopify conversion apps?
Does the Shopify integration work on the Free plan?
Does AnyTrack track the Shopify checkout?
InitiateCheckout, AddPaymentInfo) and the final Purchase are collected server-side through Shopify webhooks, so they are tracked reliably even though the AnyTrack Tag does not run on Shopify's hosted checkout pages.Can I import past conversions into AnyTrack?
How do I stop the AnyTrack click ID from showing in cart line items?
_atclid) from customers at checkout. If your theme does not follow this convention and the value appears, follow the Remove Line Item Properties guide to adjust your theme code.