
Elementor Integration
Send Elementor Pro form submissions to AnyTrack with a webhook and a hidden click ID field, so each lead is attributed to its traffic source.
What is Elementor integration?
Section titled “What is Elementor integration?”Connect your Elementor-powered WordPress website with AnyTrack to automatically track form submissions, leads, and multi-step forms. This integration collects visitor data and conversion events from your Elementor forms.
This video shows how to set up the webhook, add the required parameters to your Elementor form, and inspect your conversion data.
Why use Elementor integration?
Section titled “Why use Elementor integration?”- Accurate conversion tracking: Collect every lead and form submission automatically
- Better attribution: Connect form submissions to their traffic sources
- Improved ROAS: Make data-driven decisions with complete conversion data
- Streamlined setup: Use webhooks (automated data transfers) to send form data directly to AnyTrack
Technical details
Section titled “Technical details”| Supported features | Elementor |
|---|---|
| Plan Ad platforms need Starter or higher. | All plans |
| Required | |
| Tracking method Via Webhook | Server-side tracking |
| Setup method | Webhook URL |
| |
| Event attributes | |
| Conversion Mapping Rename or turn off events. | Yes |
| Combined Orders Groups upsells with the purchase. | No |
| Tracking Group Integration reference for AutoTag. | elementor |
| Tracking parameter Carries the click_id. | click_id |
About Elementor
Section titled “About Elementor”Elementor is a drag-and-drop website builder for WordPress.
Elementor’s form widget allows marketers to:
- Set custom webhooks (automated data transfers to external services)
- Add over 20 different field types, including hidden fields
- Create powerful lead collection forms
Step by step guide
Section titled “Step by step guide”Step 1: Add AnyTrack Tag to your website
Section titled “Step 1: Add AnyTrack Tag to your website”Install the AnyTrack tracking tag in your website’s head section to enable conversion tracking. This tag will collect visitor data and click IDs automatically.
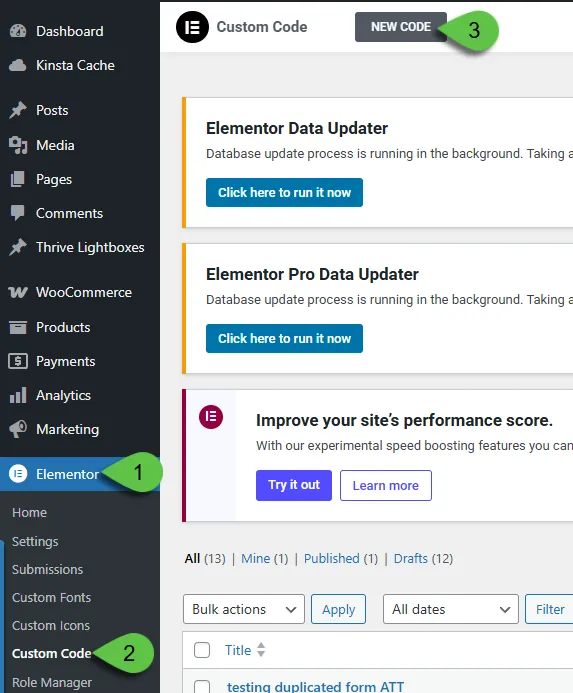
- From your WordPress dashboard, select the Elementor menu
- Click Custom Code
- Click New code
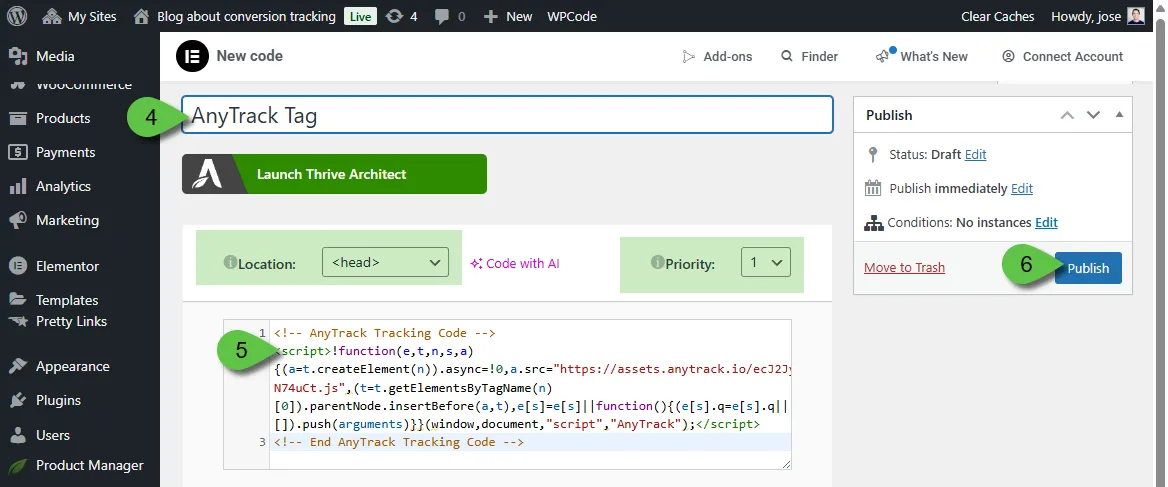
- Name the code (e.g., “AnyTrack Tag”)
- Paste the AnyTrack Tag in the code section
- Make sure Location: Head is selected
- Click Publish
- Select Entire Site and Save
Step 2: Add the Elementor Integration in AnyTrack
Section titled “Step 2: Add the Elementor Integration in AnyTrack”- Open the Integration Catalog and search for Elementor
- Click the Elementor card, then click Install
- Click the webhook URL to copy it to your clipboard
Step 3: Configure Elementor Form
Section titled “Step 3: Configure Elementor Form”- Edit the page where your form is located
- Edit the form to reveal its settings
- Open Actions After Submit Settings
- Select the Webhook option
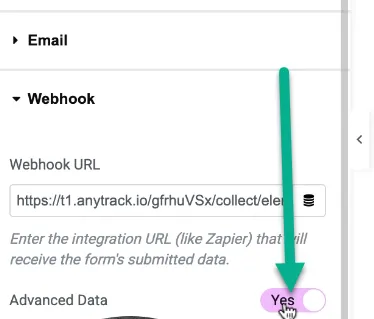
- Open the Webhook settings
- Paste the webhook URL you copied in Step 2
- Enable the Advanced Data option
- Save and Publish your form
Step 4: Configure the Elementor Form fields
Section titled “Step 4: Configure the Elementor Form fields”- Add a new field
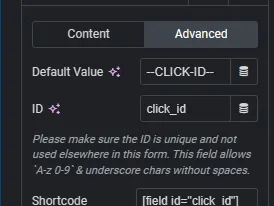
- Select Hidden as the field type
- Set Label to:
click_id - Open the Advanced tab and set Default Value to:
--CLICK-ID--
AnyTrack reads the click ID from the Label, so you do not need to change the field ID.
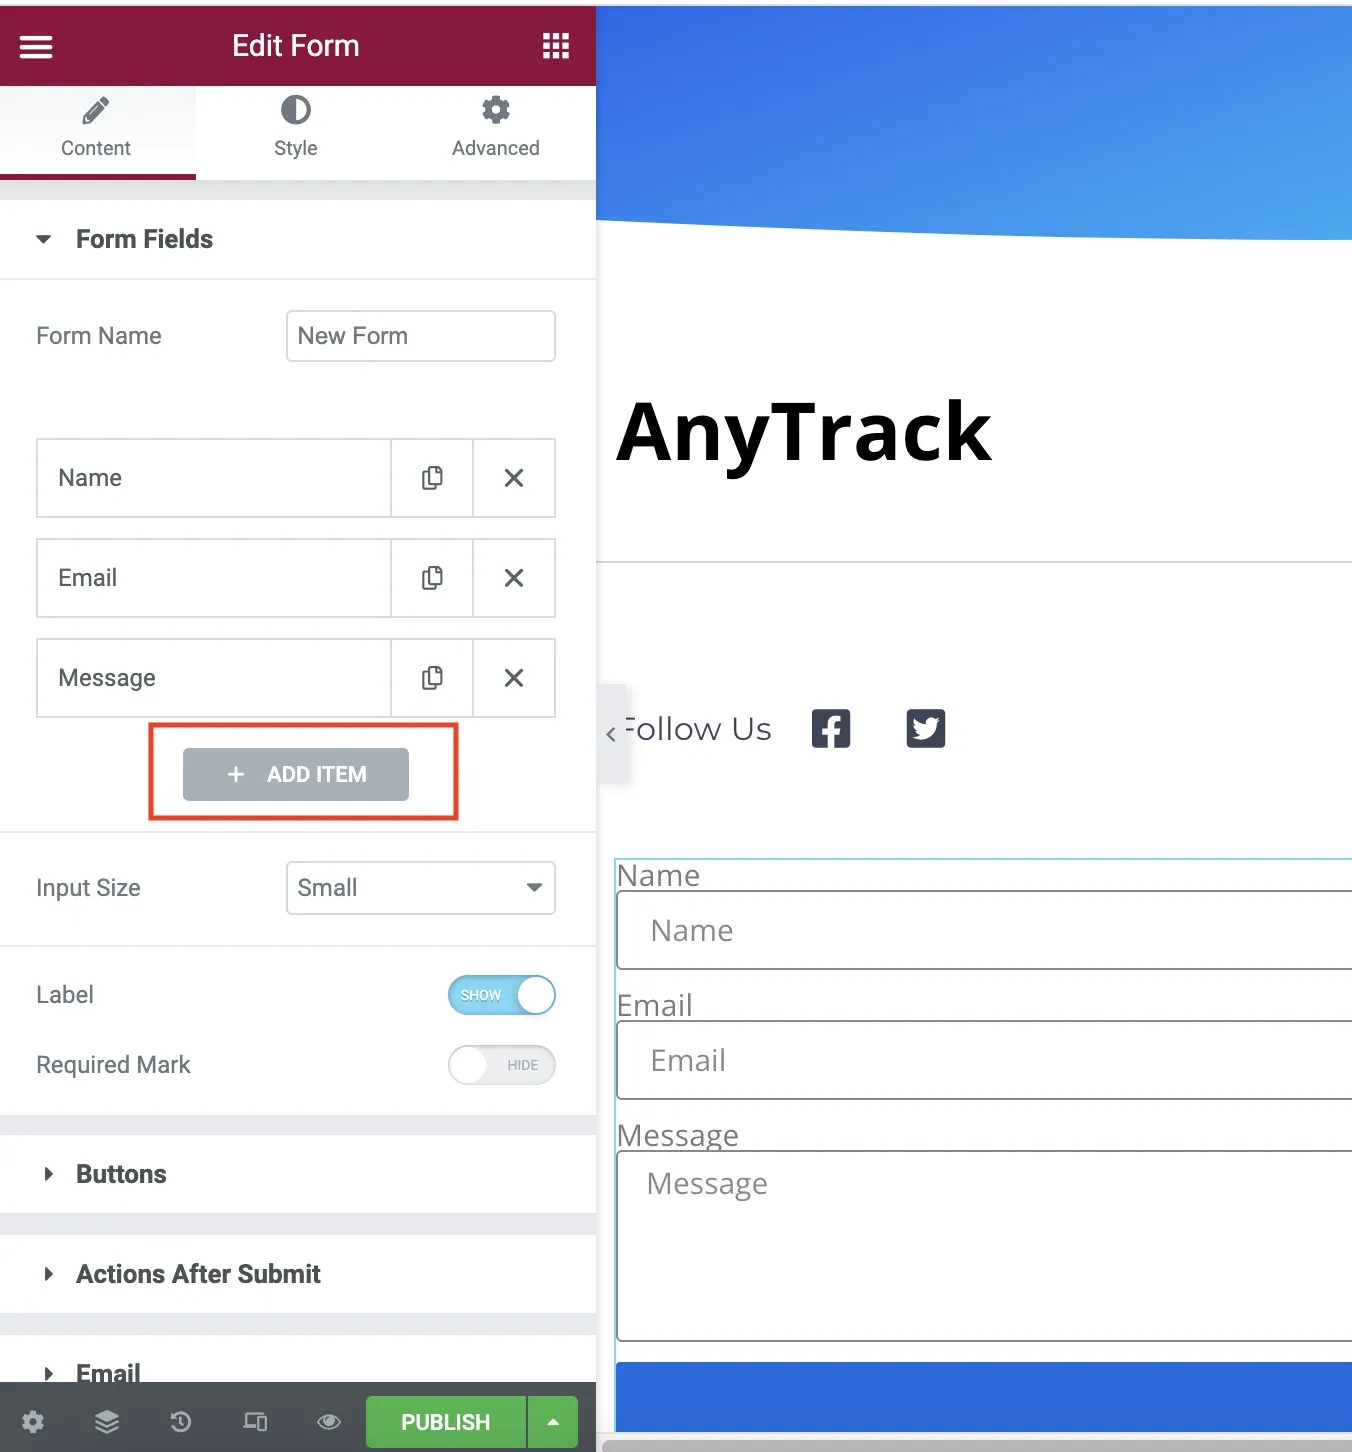
- Update other fields to follow the supported Event Attributes such as
email,phone,firstName, etc.
Step 5: Rename event (Optional)
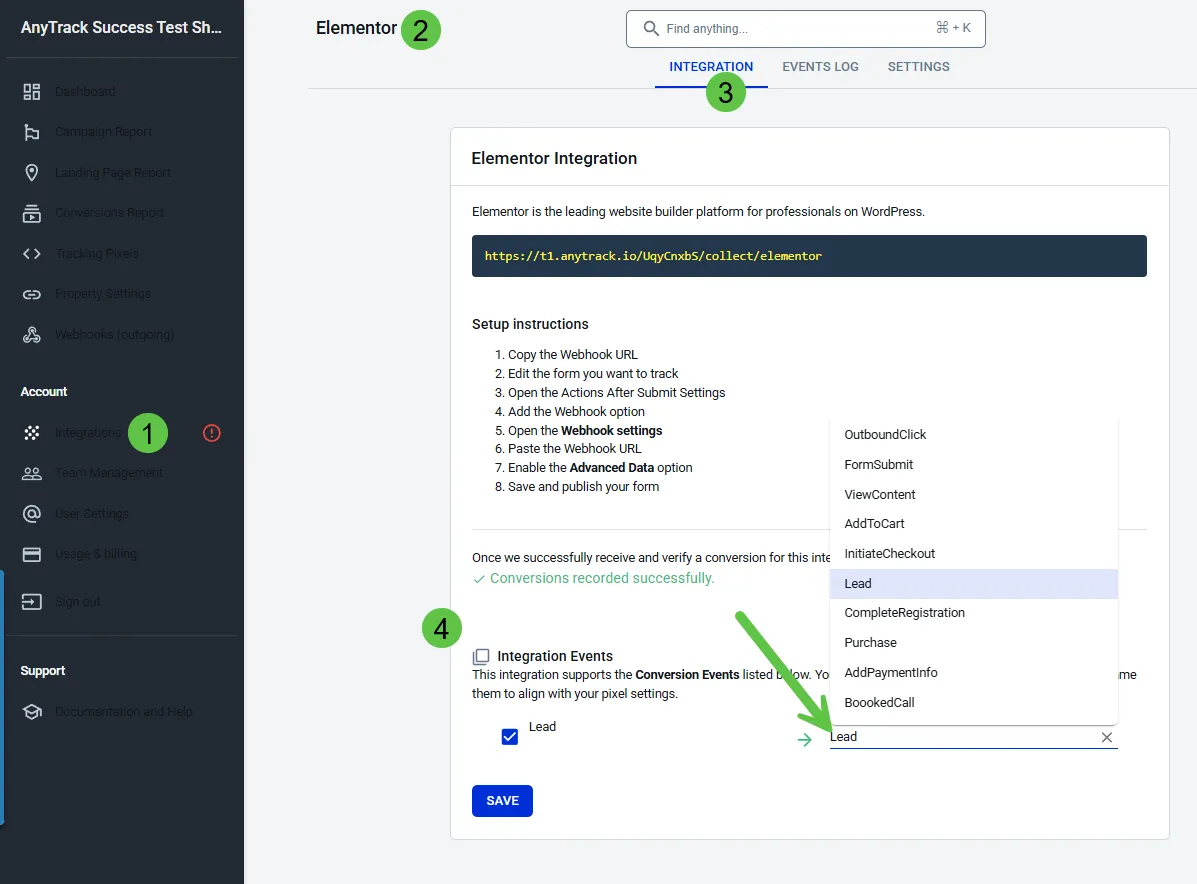
Section titled “Step 5: Rename event (Optional)”By default, Elementor forms appear in AnyTrack as Lead events. To rename the conversion:
- Navigate to Integrations > Elementor > Integration tab > Integration Events
- Select a conversion name from the dropdown menu
Step 6: Form Redirect (optional)
Section titled “Step 6: Form Redirect (optional)”To redirect users after form submission with tracking data:
- Add a Redirect form action
- Add your redirect URL
- Include parameters you want to send:
https://trafficker.io/elementor-thank-you-redirect/?clickid=[field id="field_6dc4d6d"]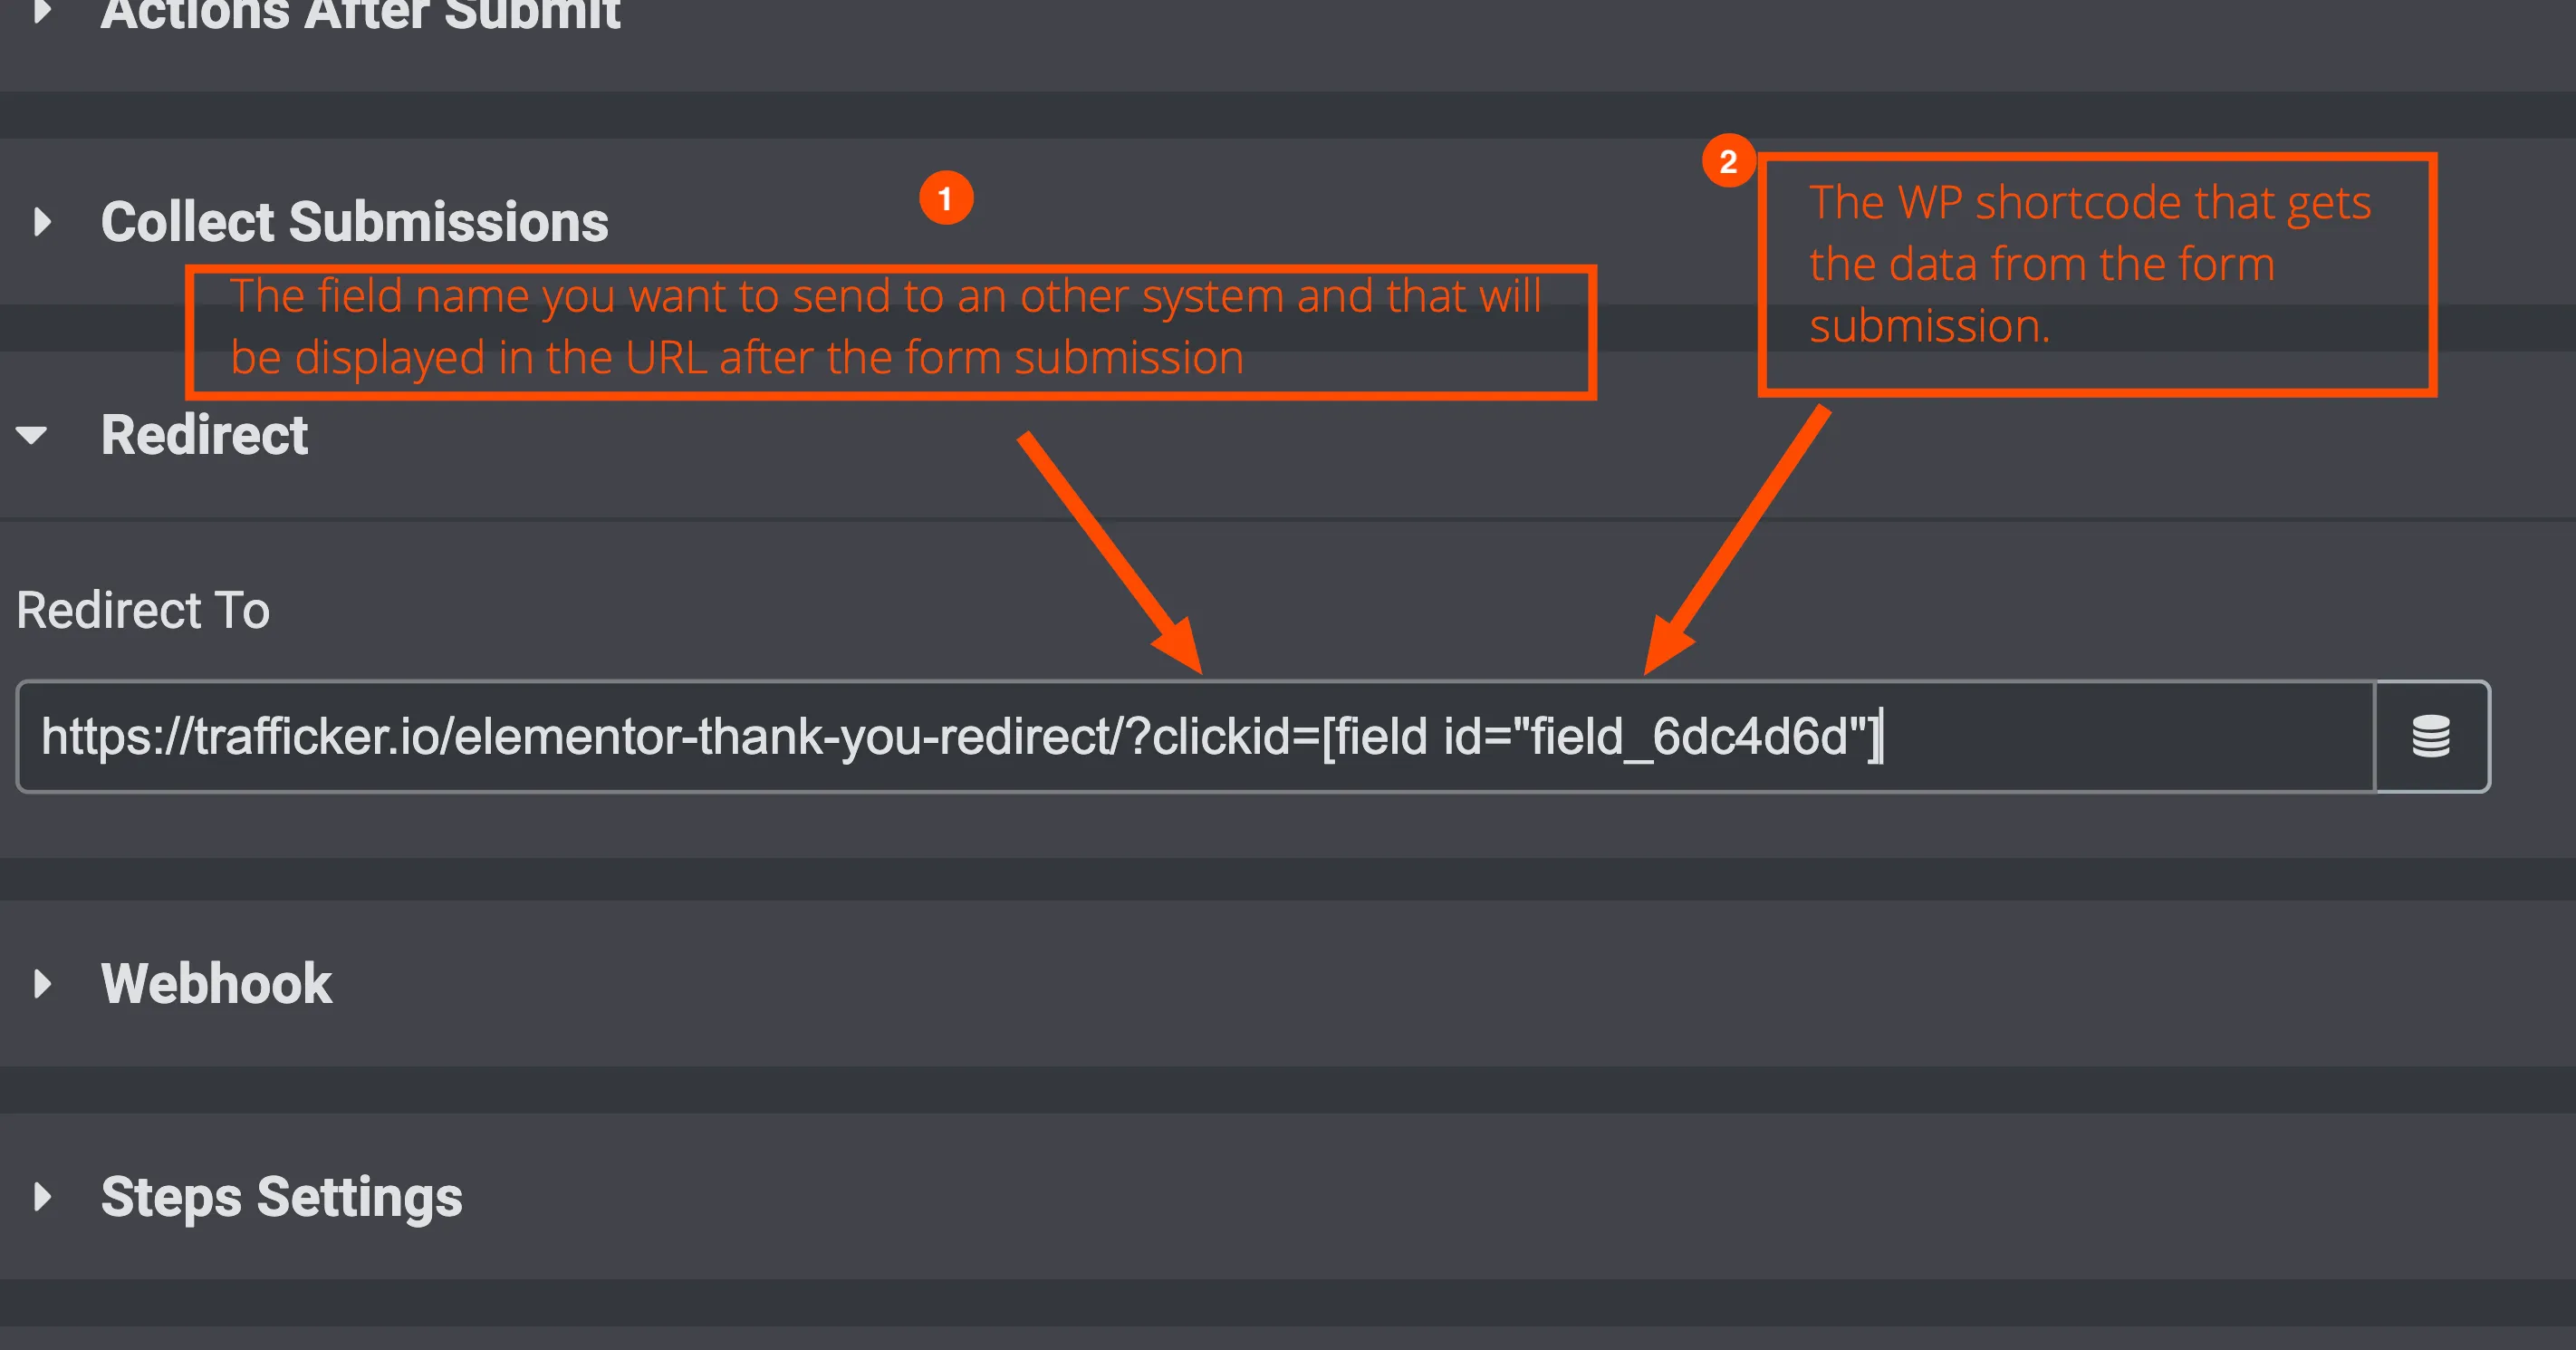
Validation
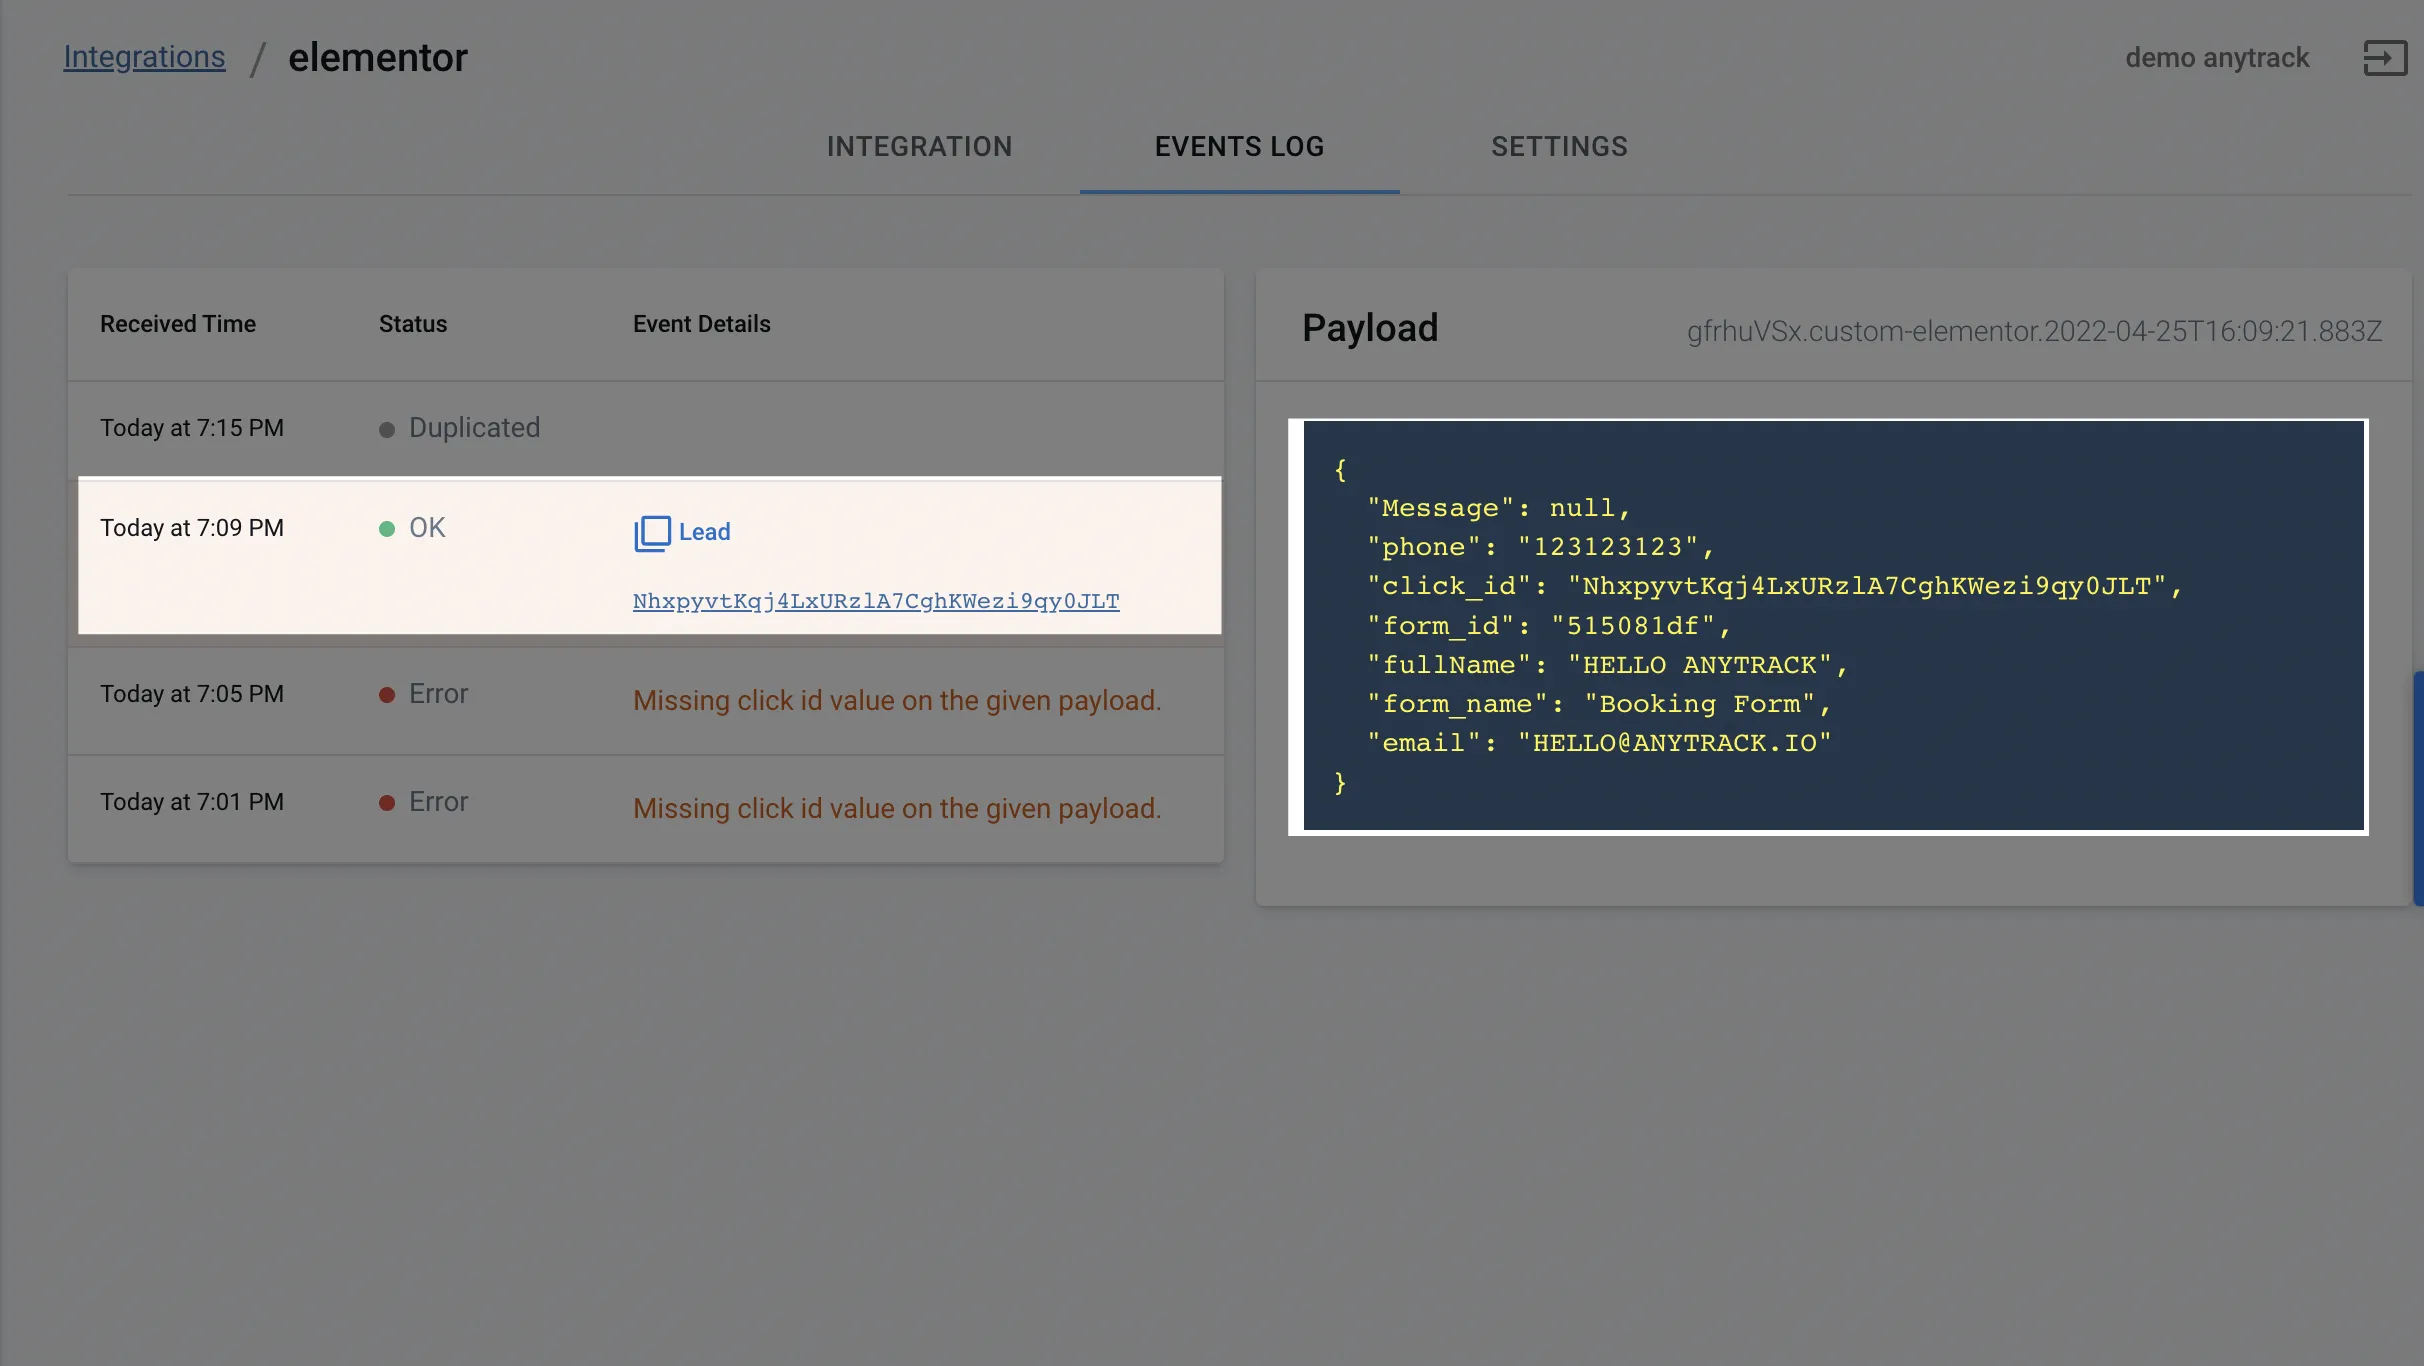
Section titled “Validation”Test your form to verify data passes correctly:
Send Elementor Leads to Your CRM
Section titled “Send Elementor Leads to Your CRM”If your Elementor form feeds a CRM, the Elementor lead is attributed on its own, but the CRM-side events (new contact, lead stages, deal progression) land under Unknown unless the Click ID travels with the lead into the CRM.
Elementor and your CRM keep the Click ID in fields with different names. The Tracking Tag puts the Click ID in the click_id hidden field from Step 4. Your CRM reads it from its own field. When you send the lead to the CRM, map the click_id value into that field:
| Destination CRM | Map click_id into |
|---|---|
| HubSpot | the AnyTrack Click ID property (parameter atclid) |
| GoHighLevel | the _atid custom field |
| LeadByte | c3 |
| Any custom CRM | a custom field you create |
The diagram shows the two paths of one Elementor lead that goes to GoHighLevel. The Elementor Lead is attributed on both paths. The GoHighLevel events are attributed only when the click_id value reaches the _atid custom field.
Elementor to GoHighLevel: One Click ID, Two Field Names


Shared start:
- Visitor lands on your WordPress page. Tools: WordPress. Tracking Tag fires. The Tracking Tag collects the Click ID. It replaces
--CLICK-ID--in theclick_idhidden field with the Click ID value. Data: click_id (present). - Visitor submits the Elementor form. Tools: Elementor, AnyTrack. The Elementor webhook sends the lead to AnyTrack with
click_id. AnyTrack attributes the ElementorLead. Data: click_id (present).
Does the GoHighLevel contact get the Click ID in _atid?
Path 1, working path: Click ID mapped into _atid.
- Contact created in GoHighLevel. Tools: GoHighLevel. Your webhook or automation maps
click_idinto the_atidcustom field. Data: click_id → _atid (present). - GoHighLevel events → AnyTrack. Tools: GoHighLevel, AnyTrack. AnyTrack collects the GoHighLevel events and reads the Click ID from
_atid. Data: _atid (present).
Path 2, broken path: Click ID not mapped.
- Contact created in GoHighLevel. Tools: GoHighLevel. The contact has no
_atidvalue. Data: _atid (missing). Break point: Nothing mapsclick_idinto_atid, so the Click ID stops at Elementor. The connection to the next step breaks here. - GoHighLevel events → AnyTrack. Tools: GoHighLevel, AnyTrack. The events arrive with no Click ID to match. Data: _atid (missing).
Both paths return to AnyTrack
Path 1 result: Attributed GoHighLevel events. AnyTrack matches the Click ID to the ad click and credits the campaign.
Path 2 result: Unknown. The Elementor Lead stays attributed. The GoHighLevel events land under Unknown.
Two field names, one value. The click_id field and the _atid custom field hold the same Click ID. Map click_id into _atid when you create the contact in GoHighLevel.
Applies to Elementor forms that send leads to GoHighLevel.
If your Elementor forms send leads to GoHighLevel and you do not use the Elementor integration, see GoHighLevel and Elementor. For the full pattern across every platform, see Pass the Click ID from External Forms to Your CRM.
Related Resources
Section titled “Related Resources”FAQ and Troubleshooting
FAQ was last reviewed on 2026-10-05